This is a deployment checklist built from a setup that has already worked in practice: the company site, the homepage contact form, and inbound forwarding for your branded email addresses.
Worth setting expectations first. This isn't a traditional multi-page site, and there's no separate contact.html. The contact feature lives in the #contact block at the bottom of the homepage, so what you ship is a single-page company site with the contact form down in the footer. If you just want the site and a contact entry point online fast, that's less to wire up, not more.
Project structure and request flow
If your project follows a similar layout, only a handful of files usually matter for launch:
index.html: the homepage itself, including the contact form.assets/styles/main.css: page styles.assets/scripts/main.js: frontend interactions, language switching, and form submission.assets/runtime-config.json: the frontend form endpoint, which defaults to/api/inquiry-email.workers/inquiry-email.js: the Cloudflare Worker that receives the form submission and calls Resend.wrangler.toml: the Worker name, domain routes, and environment variables.
The request flow for the contact form looks like this:
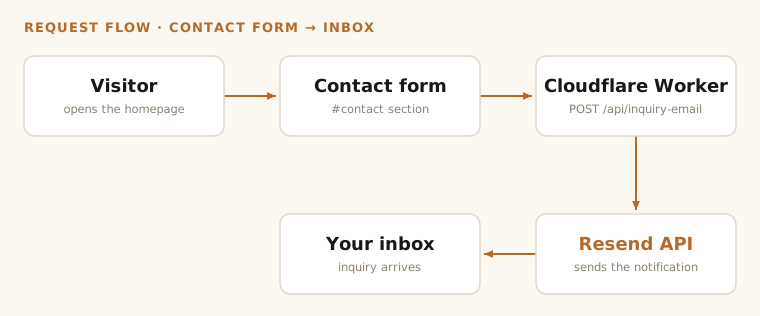
Keep one thing straight from the start: there are two separate paths here, and mixing them up is where most of the later confusion comes from.
- Outbound is the path above. The contact form posts to a Worker, and the Worker calls Resend to send you a notification.
- Inbound is company email. When someone writes to
hello@your-domain.comorsales@your-domain.com, that never touches Resend. Cloudflare Email Routing forwards it straight to your personal inbox.
What you need before deploying
- A Cloudflare account.
- A Resend account.
- A domain you control, for example
example.com. - A local environment where you can run
npx wrangler.
If you plan to serve the site straight from the apex domain like https://example.com, that domain needs to be fully managed in Cloudflare already. Custom domains, Worker routes, and Email Routing all hang off it.
If the domain isn't on Cloudflare yet, do this first:
- Add the domain in the Cloudflare dashboard.
- At your registrar, switch the nameservers to the ones Cloudflare gives you.
- Wait for the domain status to turn Active.
Basic stuff, but the custom domain, Worker routing, and Email Routing all depend on it.
Replace the default settings with your own
The sample configuration currently points at example.com. Before you go live, swap the domain, recipient address, sender address, and site copy for your own values, or the form and routes will keep pointing at the wrong place.
Update wrangler.toml
This file decides which domain the Worker runs on, which origins may call the form API, and where the notification emails go.
name = "your-inquiry-worker"
main = "workers/inquiry-email.js"
compatibility_date = "2026-06-07"

routes = [
  { pattern = "example.com/api/*", zone_name = "example.com" },
  { pattern = "www.example.com/api/*", zone_name = "example.com" },
]

[vars]
ALLOWED_ORIGIN = "https://www.example.com,https://example.com"
RESEND_API_BASE = "https://api.resend.com"
MAIL_TO = "you@gmail.com"
MAIL_CC = ""
MAIL_FROM = "sales@example.com"
MAIL_FROM_NAME = "Your Website"
MAIL_SUBJECT_PREFIX = "[Website Inquiry]"
These are the fields people most often get wrong:
routes: sends/api/*on your domain to the Worker.ALLOWED_ORIGIN: the list of origins allowed to call the endpoint. If your production site uses bothwwwand the bare domain, include both.MAIL_TO: where the inquiry email should finally land.MAIL_FROM: the sender address Resend uses. It must belong to a domain that has already been verified in Resend.
Both MAIL_TO and MAIL_CC support multiple email addresses separated by commas.
Check assets/runtime-config.json
This example starts with a same-domain setup, so the frontend submits to this path:
{
  "formEndpoint": "/api/inquiry-email"
}
That only works if both of these are true:
- The site runs on
https://example.com - The Worker runs on
https://example.com/api/*
If that's how you're deploying, leave it alone.
Only touch it when the site and Worker are deployed separately. Then point it at the full URL:
{
  "formEndpoint": "https://your-worker.workers.dev/api/inquiry-email"
}
Where to edit copy and logo
index.html: company name, phone number, address, and footer.assets/i18n/*.json: multilingual copy.assets/logo/: logo and favicon.
If your goal is to launch quickly, the bare minimum is to replace the company name, phone number, and email-related information. Otherwise the site still looks like a demo.
The contact form sends email through Resend
The form here doesn't send email from the browser. The frontend only posts JSON. The actual send happens in workers/inquiry-email.js, which calls the Resend API.
Start by adding a sending domain in Resend. Usually it's better to put outbound mail on its own subdomain:
- Website:
example.com - Sending domain:
mail.example.comornotify.example.com - Sender address:
sales@mail.example.comornoreply@mail.example.com
Splitting your website domain from your sending reputation keeps later troubleshooting cleaner.
Resend will ask you to add several DNS records. Since the domain is already on Cloudflare, add those records in Cloudflare DNS. Once the domain status becomes verified, move to the next step.
Store the Resend API key as a Worker secret:
npx wrangler secret put RESEND_API_KEY
Do not put that key in code or public configuration. A secret is enough.
Deploy the form Worker first
Deploy the Worker on its own first, just to confirm the form endpoint works. Once the API checks out, shipping the static site is much safer.
Run this from your project directory:
npx wrangler deploy
If you already replaced the routes in wrangler.toml with your own domain, you can test the endpoint like this after deployment:
curl https://example.com/api/inquiry-email
The normal response is:
{ "ok": true, "service": "inquiry-email" }
If it does not work, check these items first:
- Is
routespointing at the domain you are actually using? - Is the domain managed under the current Cloudflare account?
- Was the Worker deployed to the correct account?
- Does
ALLOWED_ORIGINinclude all production origins?
Deploy the static site from a clean release directory
The only public assets you usually need to publish are:
index.htmlassets/
Don't point Cloudflare Pages at the whole project directory directly. Keep only frontend assets in the publish directory. Files like workers/ and wrangler.toml do not belong in public output.
Build a dedicated release/ directory instead:
mkdir -p release
cp index.html release/
cp -R assets release/
Then deploy that directory to Cloudflare Pages:
npx wrangler pages deploy release --project-name your-landing-site
After deployment, Cloudflare gives you a temporary *.pages.dev URL. Use that to verify the page and static assets before you attach the real domain.
Attach the production domain to Pages
In the Cloudflare dashboard, go in this order:
- Open Workers & Pages.
- Enter your Pages project.
- Open Custom domains.
- Add
example.com. - Add
www.example.com.
If you bind the apex domain example.com, that domain must already be in the current Cloudflare account and the nameservers must already point to Cloudflare.
Cloudflare Email Routing handles inbound company mail
"Company email" here really means inbound forwarding for your company domain. It's not a full office email suite, but early on it's usually more than enough:
- Publicly, you tell people to email
hello@example.com - Behind the scenes, Cloudflare forwards that mail to your personal inbox, such as
yourname@gmail.com
For an early-stage site this is light and cheap. You don't have to run your own mail server or buy a full business email suite on day one.
Enable Email Routing
The prerequisite is still the same: the domain must already be managed in Cloudflare.
In the Cloudflare dashboard:
- Open your domain.
- Open Email Routing.
- Choose Add records and enable.
Cloudflare will automatically add the MX and TXT records required for Email Routing.
One snag shows up a lot here: the domain may already have MX records from another mail provider. Cloudflare Email Routing won't share inbound duty with a second mail system, and that clash trips up plenty of people.
Create public addresses and forward them to your inbox
Then create the routing rules:
- Open Routing rules.
- Choose Create address.
- Create an address such as
hello@example.com. - Set the Destination address to your personal inbox, such as
yourname@gmail.com. - Open the verification email in that inbox.
- Finish the verification.
Once verification is complete, any mail sent to hello@example.com will be forwarded automatically to your personal mailbox.
If you are just getting the site online, these addresses are usually enough:
hello@example.comsales@example.comsupport@example.comcontact@example.com
If the team is still small, forwarding all of them to the same inbox is perfectly fine.
One limit worth knowing early: by default, Cloudflare Email Routing forwards one custom address to one destination inbox. If you want hello@example.com to fan out to several people, the default rule won't cut it. You'd need extra Worker logic, and each destination address has to be verified first.
Sending and receiving are two different systems
The first time you set this up, it's easy to assume Resend and Email Routing are the same thing. They're not. They do completely separate jobs.
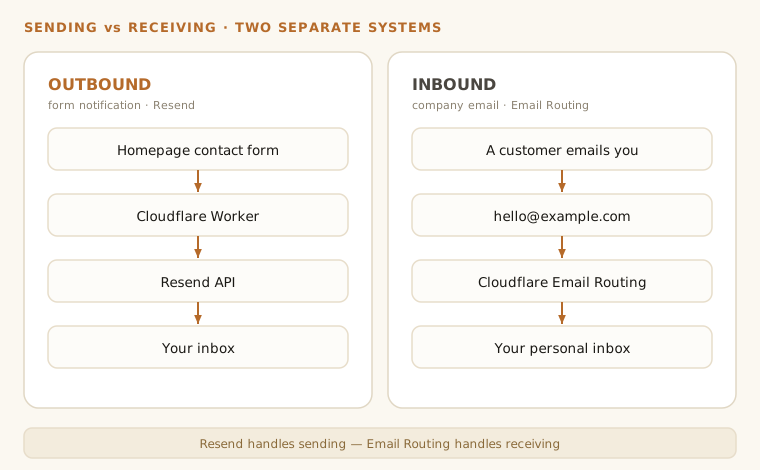
The contact form notification email is sent by Resend:
- The homepage form submits to the Worker.
- The Worker calls Resend.
- Resend sends the inquiry notification to your inbox.
Inbound company email forwarding is handled by Cloudflare Email Routing:
- A customer sends mail to
sales@example.com. - Cloudflare receives the message.
- Cloudflare forwards it to your personal inbox.
The short version: Resend sends, Email Routing receives.
Recommended deployment order
Follow this order and you'll usually avoid the detours:
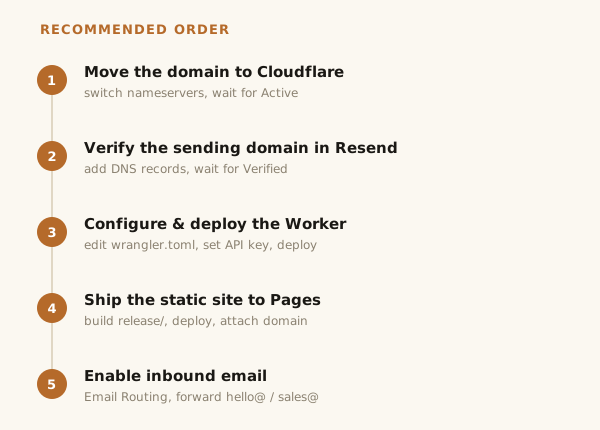
- Move the domain to Cloudflare and complete the nameserver switch.
- Verify the sending domain in Resend.
- Replace the domain, allowlist, recipient mailbox, and sender mailbox in
wrangler.toml. - Configure
RESEND_API_KEY. - Deploy the Worker and confirm that
/api/inquiry-emailresponds normally. - Prepare the
release/directory. - Deploy the static site to Cloudflare Pages.
- Attach the real domain to Pages.
- Open the website and submit a manual test form.
- Enable Cloudflare Email Routing.
- Create addresses such as
hello@andsales@, and forward them to your personal inbox.
The logic is simple: get the API working first, ship the page second, add inbound email last. Then anything that breaks is much easier to pin down.
The most common problems
If the page opens but the form cannot send, check these first: does ALLOWED_ORIGIN include every production domain, is RESEND_API_KEY configured, and is formEndpoint pointing to the correct URL?
Worker deployed but no email ever arrives? First check that MAIL_FROM belongs to a domain already verified in Resend, then confirm that MAIL_TO is correct. Most of the time the code is fine and the sender domain just isn't fully verified yet.
If the site works but /api/inquiry-email returns 403, the most likely cause is an origin allowlist mismatch. This happens all the time when www and the bare domain get mixed.
If Email Routing won't enable at all, it's almost always one of three things: the domain isn't fully managed by Cloudflare yet, the nameserver switch hasn't propagated, or the DNS records still contain MX entries from another provider.
If the page deploys correctly but the form is calling the wrong endpoint, go back to assets/runtime-config.json. Keep /api/inquiry-email for same-domain deployments, and only switch to a full URL when the site and Worker are deployed separately.
If npx wrangler deploy fails with a "route already exists" error, another Worker in the same Cloudflare account has already claimed that route. Open Workers & Pages in the dashboard, find the old Worker, and remove the conflicting route, or delete that Worker, before deploying again.
Previewing the page locally
If you only want to preview the homepage locally, run this from your project directory:
python3 -m http.server 4173
Then open:
http://127.0.0.1:4173
This is enough to review the page and copy. If you want to test the form locally as well, you still need to run the Worker and point formEndpoint to a local or test endpoint.
Short command checklist
# Configure the Resend API key
npx wrangler secret put RESEND_API_KEY

# Deploy the form Worker
npx wrangler deploy

# Build the static site release directory
mkdir -p release
cp index.html release/
cp -R assets release/

# Deploy the site to Cloudflare Pages
npx wrangler pages deploy release --project-name your-landing-site
Everything else happens in the Cloudflare dashboard:
- Attach the production domain to Pages.
- Create inbound forwarding rules in Email Routing.
At this point, the main path for the company site, contact form, and inbound forwarding is in place. What's left is mostly swapping in your own domain, DNS, and mailbox settings, then wiring them up to Cloudflare and Resend in the right order.