Before discussing this issue, let's look at the structure of drone.
Structure
drone consists of 3 main parts, namely drone-server, drone-controller and drone-agent.
drone-server
As the name suggests, drone-server is the server side of drone. It starts an http service to handle various requests, such as webhooks triggered by every github push or other operations, or every request from drone-web-ui.
drone-controller
The role of the controller is to initialize pipeline information. It defines the functions for each step of the pipeline before execution, after execution, and for obtaining and writing execution logs, and ensures that each pipeline can execute steps in order.
drone-agent
The role of drone-agent in drone can be simply understood as the role of kubelet in k8s. Since this article mainly discusses the execution process of drone in k8s, in k8s, the execution of drone does not depend on drone-agent, so this article will not cover this component in detail.
Execution Process
server
- After a commit is completed on github, github will send the information of this commit to
/hook. Afterdrone-serverreceives the request, it will parse this information intocore.Hookandcore.Repository. - Then it searches for the repository in drone's database according to the
namespaceandnameof the repository. If it cannot be found or the project is not in active state, the build is directly terminated and an error message is returned. Otherwise, the subsequent task is handed over totrigger.
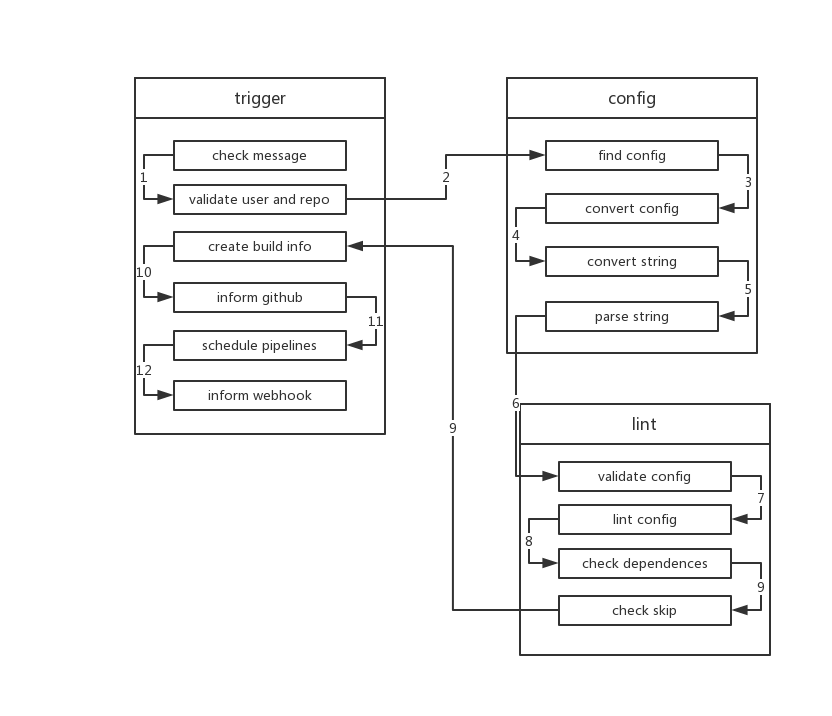
trigger
- After receiving
core.Hookandcore.Repository,triggerwill check whether there are fields like[ci skip]in the commit message to skip the execution of ci. If so, it ends directly. - Then
triggerverifies whetherrepoandownerare valid, and whether the commit message is empty. If it is empty,triggerwill call the relevant api to get the commit message of the last submission. - Next,
triggerwill request the build configuration fromConfigService. Usually, this is the content in.drone.yml.ConfigServicecan be extended through theDRONE_YAML_ENDPOINTenvironment variable. If not extended, it uses the defaultFileService, which calls the relevant github interface to get file data. - After getting the config, trigger will call
ConvertServiceto convert the config, converting the config intoyaml(because configuration files are not alwaysyaml, they may bejsonnetorscriptor other formats).ConvertServicecurrently supportsjsonnetandstarlark. Among them, starlark needs to be configured using an external extension, namelyDRONE_CONVERT_PLUGIN_ENDPOINT. - After Convert, trigger will parse the yaml again. This is firstly to convert the yaml format of the old version of drone to the new format, and secondly because drone is compatible with
gitlab-ci, this step can convert the configuration format of gitlab-ci to the configuration format of drone. - Next, trigger parses yaml into
yaml.Manifeststruct. After that, it callsValidateServiceto verifyconfig,core.Build,repo ownerandrepo.ValidateServiceis configured by theDRONE_VALIDATE_PLUGIN_ENDPOINTenvironment variable. If not present, this verification step will not be performed. - Next,
triggervalidates whether eachpipelineinyaml.Manifestis valid. It checks forduplicate pipeline names, whether steps haveself-dependency, whether there aremissing dependencies, andpermissionsetc. - After each pipeline passes verification,
triggerusesdirected acyclic graph(DAG) to check if there arecircular dependenciesbetween pipelines, and checks which pipelines do not meet execution conditions. - At the same time, it checks whether each pipeline meets execution conditions. Including whether
branch,event,action,ref, etc. are met. - After all the above verification conditions are passed,
triggerupdates the information in the database. Then each pipeline is built into acore.Stage. If a stage has no dependencies, itsstatuswill be set toPending, which means it can be executed. If there are dependencies,statuswill be set toWaiting. triggercreatesbuildinformation in the database and sends the build status to github. At this point, we can see that little yellow dot in github.- Then
triggertraverses eachstageand schedules stages with statusPending. - Then sends the build information to the address configured by the environment variable
DRONE_WEBHOOK_ENDPOINT. At this point, the work oftriggeris over.
controller
Because of the convenience brought by k8s, scheduling a stage only requires creating a job. Before creating the job, scheduler injects most of the environment variables in drone-server into the job, namely drone-job-stage.ID-randomString (because k8s has specifications for resource names (cannot start or end with . _ -), while other runtimes of drone do not have this requirement, so to comply with k8s naming conventions, drone uses random characters as resource names). When creating the job, for some reasons (mentioned later), drone also mounts a HostPath volume to the job, with path /tmp/drone. The image name of the job is drone-controller.
drone-controllerinitializes the externalSecretService, which is configured byDRONE_SECRET_ENDPOINT.- Next,
drone-controllerinitializes threeregistryServices, which are two external definitions (configured byDRONE_SECRET_ENDPOINTandDRONE_REGISTRY_ENDPOINT) and local file (path defined byDRONE_DOCKER_CONFIG). drone-controlleralso initializesrpc clientto communicate withdrone-server.- Finally, the controller initializes the
k8s engine. At this point, the initialization of the controller is complete, and the subsequent work is handed over to the internal componentrunnerto execute.
runner
runnerfirst gets the detailed information of the stage fromdrone-serveraccording to the id of thestage.- Then gets the
tokenneeded to clone the repo according to the obtained repo.ID. After receiving the request,drone-serverfirst verifies the repo and user. After passing, it obtains the token from github for pulling the project. - Then runner checks the status of the build. If it is not
killedorskipped, it executes the build. - After verification is complete,
runnerparses the format ofyamlagain. This step is the same as the step executed in trigger. - Afterwards, runner replaces all data inside
${}in yaml with corresponding environment variables. - Then runner gets the detailed information of the pipeline it needs to execute from yaml according to the stage name (because yaml often contains multiple pipelines), and then performs a lint on its own pipeline information. This lint is the same as the operation in step
7intrigger, aimed at ensuring the validity of metadata. - Next, runner starts setting a series of
transform functions, includingregistry,secret,volumeetc. These functions inject corresponding resources intoSpecin the subsequentCompile. For example,secret functiongets the corresponding secret and adds it tospec. - When the above operations are completed, runner calls the
compilermodule to start compiling thepipeline.
compiler
- At the beginning of
Compile, compiler first confirms whether all steps of the pipeline areserial(if there are dependencies in the step, it is not serial). Then it mounts a working directory for the pipeline, that is, injects avolumeintospec, which isEmptyDir. - Then injects all volumes defined in yaml into spec.
- compiler checks if the pipeline needs to clone repo. If the pipeline does not define
clone:
  disable: true
, compiler injects clone-step into spec. Compiler initializes the step information such as step name, image, mount workspace. 4. After handling clone step, compiler handles all Services in the pipeline. Each Service is also converted into a step and injected into spec. But unlike ordinary steps, service is set to run independently, in other words, they do not depend on any step. Similarly, compiler performs initialization work similar to clone step for each service-related step. 5. Next is handling different steps. Handling ordinary steps is divided into two cases. One is that build configuration is used in the step. Using this configuration, drone automatically packages the repo during the execution of this step. Because docker needs to be used during the packaging process, when handling this step, docker.sock file needs to be additionally mounted to the container. The other case is handled according to the normal process.
Normal process (including clone, services and steps): 1. Copy everything copyable from yaml data to spec 2. Inject volumes configured in yaml into spec 3. Inject envs configured in yaml into spec 4. Inject configuration in setting in yaml as environment variable "PLUGIN_:\"+key: value into spec (some env and setting values may be from_secret, here secret is injected for spec) 5. Convert command defined in yaml to file, path is "/usr/drone/bin/init" and inject into spec (only need to run this script later when running)
- Finally, compiler executes all previously defined transform functions, injecting
docker auth, environment variables from controller andDRONE_RUNNER_*definition, network rules and secrets obtained fromSecretServiceinto spec. At this point, all information of spec has been generated.
hook
- Next, runner sets the status of all steps in the stage to
Pendingand saves them to the execution list, and initializesruntime.Hook. In hook, it defines which steps need to be executed before and after executing each step. Before executing each step, astreameris created to receive logs, and update the status of the step in the database, then push the repo information to the bound client through long connection. After each step execution, updates information in the database, pushes events, and deletes the previously createdstreamer. hook also defines write log function so that obtained logs are written to log library. - After defining hook, runner sets the status of the stage to
Running. Before starting build, runner updates the status of the stage, saves each step to the database, and then updates the entire build information.
runtime
- After
runnerinitializesruntimeinformation, it callsruntime.Runto execute the build. This step is the real start of the build. runtime first calls the previously definedBeforefunction to create streamer, then k8s creates a namespace with a random string as name. Next, all steps will be completed in this namespace. After creating namespace, createsecretrequired for build, then create aconfigmapfor information incommandof each step. - After creation, runtime starts executing each step. runtime judges whether there are dependencies between steps. If not, they are executed one by one in order. If there are dependencies, run steps without dependencies first. After running the step, remove the step from the depend list of other steps that depend on it, and then proceed as above until all steps are run (this process is concurrent).
- The execution of each step is actually creating a pod in k8s. The image of the pod is the image defined in each step in the set yaml. All pods run under the 👆 namespace. In order to ensure that each pod can share files, all pods need to be scheduled to the same machine and mount
HostPath Volumeunder the same directory. And this machine is the machine wheredrone-job-stage.ID-randomStringis scheduled. When each pod runs, runtime registers a callback function to listen to pod changes. If the status of the pod becomesrunningorsucceedorfailed, runtime goes to get the log of the pod and write the log intostreamer. Finally, after the pod finishes running, runtime collects the exit status of the pod to determine whether it is normal exit or abnormal exit. - Wait until all pods are executed (or a pod fails execution), runtime first updates the status of relevant data in the database, then does cleanup work, and checks all pipelines in the current build. If a pipeline depends on other pipelines and other pipelines have been executed, then
schedulethat pipeline. - Until all pipelines in build complete scheduling, this build ends.
